Calibration Model Wizard - Step 2 - Model Setup
Step 2 guides you through the general setup of the new calibration model. The dialog allows you to select the calibration model, the properties to be calibrated and specific calibration parameters.
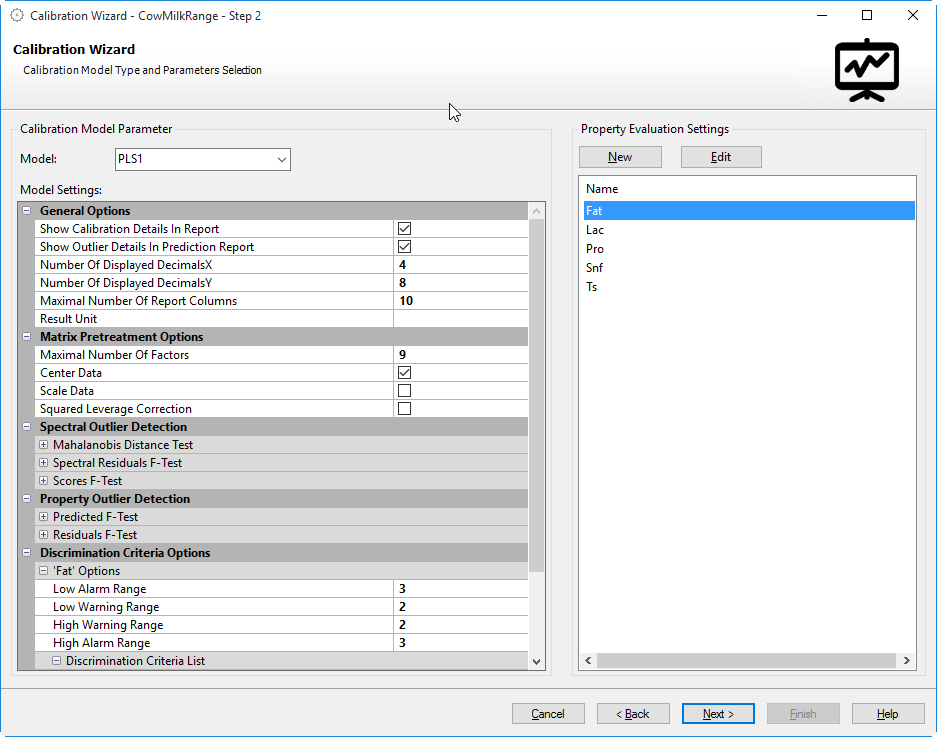
Calibration Model Parameter
Calibration Model
Select the desired calibration model from the drop-down box. The following models are available:
-
PLS1
-
PLS2
-
SIMPLS
-
MLR
-
PCA
-
PCR
-
Univariate
Model Settings
These additional parameters allow further adjustment of the calibration model and result.
Prediction Result Options:
-
Show Calibration details in report
This option is designed to hide potentially sensitive/unwanted information from the calibration reports when using calibration in routine analysis of unknown samples. This flag controls if Ranges, Calibration Pre-Processing, Calibration Data and Regression Statistics will be included in the report when unknown spectra are evaluated via the function 'Evaluate with...' in the Quantify Menu. This only applies to finished calibrations which are applied with the function evaluate. Check this option to include all Calibration Ranges, Calibration Pre-Processing, Calibration Data and Regression Statistics in the calibration report when spectra are evaluated. -
Show outlier details in prediction report
If this option is used (which is the default) the results of outlier detection according to predefined outlier tests and discrimination criteria settings are displayed in detail on the prediction result report. Otherwise such details are not displayed. See Evaluate With... feature for details. -
Number of displayed decimals
Specifies the visible number of decimals for labels and predicted values in reports. -
Number of Report Columns
Specifies the number of columns the results will be presented in. -
Result Unit
Specifies the unit of the calibration results.
Matrix Preprocessing Options:
-
Number of factors to analyze
Specifies the maximum number of factors that may be used in the calibration model. -
Mean centering
This parameter controls, whether the data matrix used for calibration is centered before calculation or not. -
Variance scaling
This parameter controls the scaling of the data matrix. -
Use squared leverage correction
Specifies wether the data matrix is leverage corrected or not.
Polynomial fit (only available for the univariate model):
-
Polynomial order
Specifies the order of the polynomial used in the calculation -
Data passes through origin of the coordinate system
Specifies if the regression line is forced through the origin (0,0).
Discrimination Criteria Options
If the calibration contains multiple constituents, the discrimination criteria for each constituent can be specified. Default discrimination criteria are a factor of 2 for the warning limit and a factor of 3 for the alarm limit. Please see below for the actual calculation formulas of the different parameters.
-
Warning Limit
Specifies the low and high warning limit factor. If these limits are exceeded a warning will be displayed. -
Alarm Limit
Specifies the low and high alarm limit factor. If these limits are exceeded an alarm will triggered. -
Outlier Detection Status
Specifies the statistical basis for the detection of outliers.
Calculation details:
Parameter
Limits
Formula for Low Limit
Formula for High Limit
Predicted
calculated according to the actual concentration range (not the predicted concentrations!)
Minimum(actual) - limit * SECV
Maximum(actual) + limit * SECV
Residuals
calculated according to the prediction residuals
Minimum(residuals) - limit * SECV
Maximum(residuals) + limit * SECV
Spectral Residuals
calculated according to the worst spectral residual
0.0 for both limits as a constant
Worst(spectral residual) * limit
Spectral Residual F-Ratios
calculated according to the worst spectral residual F-Ratio
0.0 for both limits as a constant
Mean(spectral residuals) + (Maximum(spectral residuals) * (No. of calibration spectra - 1) * limit)
Mahalanobis Distance
not calculated, limits are constant
Low Alarm: 0.0
Low Warning: 0.0
High Warning: 3.0
High Alarm: 3.0
Scores
calculated as interval according to the worst score value = biggest distance from mean score value
Mean(Scores[factor]) - (Worst(Scores) * limit)
Mean(Scores[factor]) + (Worst(Scores) * limit)
Property Evaluation Settings
By convention, the constituents/properties to be calibrated must be located in the labels of all data used in the calibration. Thus each data object requires the same label which needs to hold a certain value. These values may indicate a concentration, a fraction, color value, etc. However, it must be a quantifiable value, which can be interpreted in a statistical manner. The application will scan all selected data for common labels with numerical values and will display these in the dialog.
The most convenient way to add a new label, change existing label or remove labels from multiple spectra at once is using the Label Editor dialog. New Properties can be added directly in this step of the wizard using the New Property button. Clicking on this button will start the Label Editor. It is also available in step 4 of the Calibration Model Wizard. Outside of the wizard the Label Editor can be started from the Tools menu.
Depending on the selected calibration model, one ore more labels need to be chosen. Multiple labels can only be selected when using PLS2, SIMPLS and PCR as model. Select the appropriate label by left clicking. Hold the CTRL-key to select more than one label.
In case of a PCA calibration there are two different options to choose for the property evaluation settings and an additional Groups parameter will be available (see below):
-
Normal PCA - No Property/Groups defined
By selecting this option a normal PCA calibration without any property/group definition will be executed. The calibration will yield the regular PCA results, but the software will not be able to automatically assign the calibration samples to groups. The groups parameter selection will be disabled when choosing this option. -
Property selectionBy selecting an available label/property the software will automatically analyze the different contents of this label and display them in the Groups parameter section. The user may choose different assignment options for the available groups and the software will use these settings to automatically assign the calibration samples to the groups according to the PCA calibration results. Refer to the Groups section below for further details.
Groups (only available for PCA)
If the PCA calibration model is chosen an additional Groups parameter will be available. Since the PCA is a qualitative calibration, the Groups parameter is used to display/define the possible assignment options for the previous selected property. The following screenshot shows an example with a selected property that has four different assignment options:
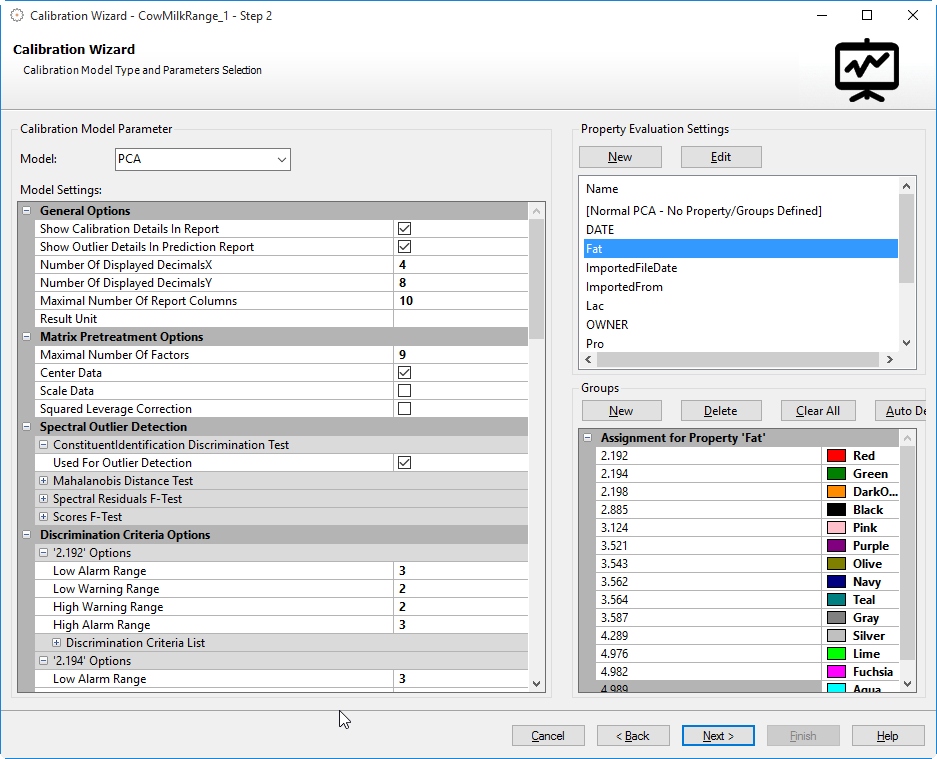
In the above example the label "Material" has been selected which contains four different values. These values will be autodetected and assigned to groups as shown in the screenshot. The PCA calibration will try to assign the calibration samples to these four groups. Samples that do not fit into any of these groups will be marked as unassigned in the calibration results.
Navigation
Just click the Next > button to proceed to the next step.
Clicking the Cancel button will abort creating a new calibration.