Manage Leasing License
This feature requires a License Leasing Server being installed in your company network infrastructure. For details please contact us.
The License Leasing Server offers available licenses within your company network for lease. This means, the software can be installed and used on many computers within your company without having as many licenses as installations. Since not all software packages might be in use at the same time, the company will purchase just a couple of leasing licenses with appropriate functionality based on the frequency of use.
As an example imagine, that you have ten different places of work where the software is installed and people like to work. Some might be in the lab others are installed in the office. Not all ten installations will be used at the same time for sure. Probably, only five computers with licenses will be used at the same time but at the different places of work by different people working there. In such cases, the company would only require to purchase five leasing licenses instead of ten perpetual licenses of the software to let everybody do their work. In addition, there is no need for product registration on every single computer anymore since the software automatically tries to obtain a suitable leasing license from the License Leasing Server on startup of the application. In case the maximum number of leases is reached, additional license requests will be denied by the License Leasing Server and the user must wait until another user closes the software and hence returns the lease to the Leasing License Server.
Choosing your preferred Software Functionality
The software offers a lot of different features requiring an appropriate license key accordingly. However, some users in the lab probably just like to record spectra and will not do comprehensive data evaluation e.g. using Mathematics or Chemometrics. In this case, the lab user would only require a rather basic license whereas a user in the office, where data analysis is done, would need a license offering more comprehensive features.
Clicking the Manage Leasing License menu entry in the Help menu lets you choose your preferred functionality you need to achieve your work. The following dialog is opened:
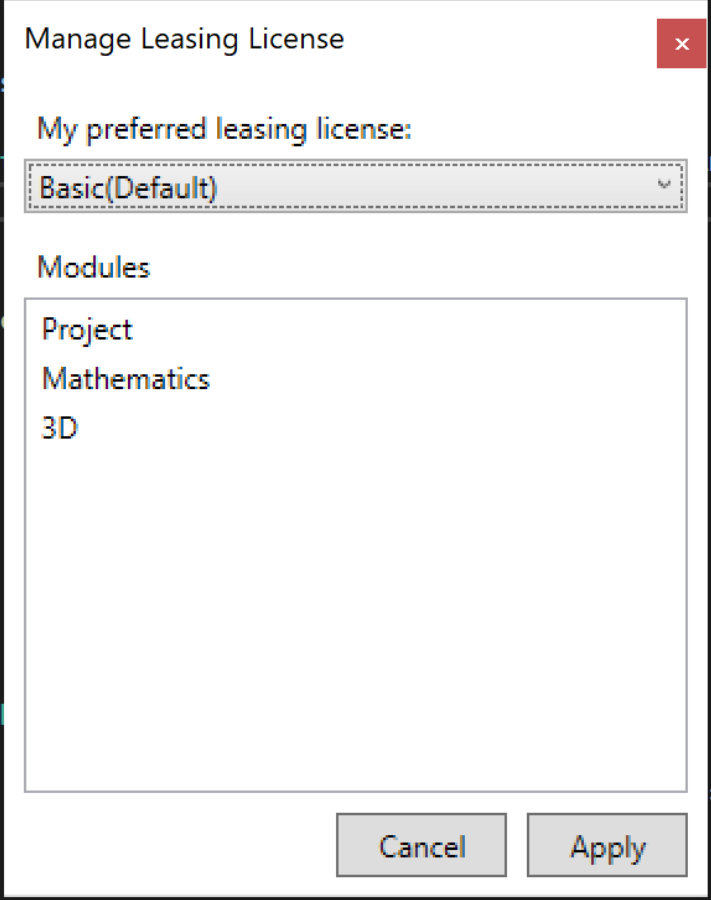
In the drop down box you can see a list of all the different licenses being available in your company. When selecting one of them, the list underneath is updated showing the particular software modules available with the license.
Choose the license type you preferrably want to work with and click the Apply button.
In case you change your preferred license type the software needs to be restarted to make your choice become effective.
If your preferred license type is not available on startup of the software because all leasing licenses of that type might be in use, a message box is displayed asking whether you would also like to work with another available license type instead. This license might have different functionality but you may still be able to work.In case this situation occurs quite frequently, you should consider to purchase more leasing licenses. Please contact us for an offer accordingly.
The module names are aliases for particular software features. A quick summary is given in the folloiwng:
Configuring the software for use with a License Leasing Server
In order to use the software in combination with a License Leasing Server, you have to configure the following:
- Preferred Leasing License Types
- Connection to the License Leasing Server
Preferred Leasing License Types
The serial number licenses are only alpha-numeric codes, which are used to register and activate the software. However, it is impossible to know, which features are included when you see a particular serial number license. For this reason you do not see a list of available serial number you can choose from in Manage Leasing Licenses, but a list of License Types, which include the modules you like to use. You may customize the license types yourself as described in more detail now.
You simply create a list of your preferred features/modules and name it. Each entry is a license type you can choose as preferred license type. By defining one or more of such license types and choosing your preferred license type as described above it is very easy to get the appropriate license from the License Leasing Server without knowing anything about serial numbers.
Follow the steps below to create license types:
-
Close the software before you do the following steps
-
Open Windows Explorer and navigate to the installation directory of the software (typically, C:\Program Files\LabCognition\panorama)
-
Edit the Panorama.exe.config file with a text editor (e.g. Notepad)
Make sure to have administrator rights when starting the editor!If you do not have administrator rights, you are not permitted to save the file in that location. Alternatively, you can create a copy of the file in a temporary folder you have permission to write and then copy the modified file back to the original location afterwards.
-
In the section configuration add the following lines (without the configuration start and end tags depicted with grey background!):
  \<configSections\>
    <section name="leasing" type="Panorama.Leasing.Config.LeasingSection, Panorama"/>
  </configSections>
  \<leasing\>
    \<models\>
      <add name="Basic"
           isDefault="true">
        \<modules\>
          <add key="Project"/>
          <add key="Mathematics"/>
          <add key="3D"/>
        </modules>
      </add>
      <add name="Pro">
        \<modules\>
          <add key="Project"/>
          <add key="Mathematics"/>
          <add key="3D"/>
          <add key="QuantifyUni"/>
        </modules>
      </add>
      <add name="Quant">
        \<modules\>
          <add key="Project"/>
          <add key="Mathematics"/>
          <add key="3D"/>
          <add key="QuantifyUni"/>
          <add key="QuantifyMulti"/>
        </modules>
      </add>
      <add name="RX">
        \<modules\>
          <add key="Project"/>
          <add key="Mathematics"/>
          <add key="3D"/>
          <add key="QuantifyUni"/>
          <add key="QuantifyMulti"/>
          <add key="ReactionMonitoring"/>
        </modules>
      </add>
    </models>
  </leasing>
</configuration>``` -
In one of the license type definitions please add the line isDefault="true" to let the software know which configuration is the default one.
-
Save the exe.config file.
Connection to the License Leasing Server
In addition to the license types, you have to configure which License Leasing Server you want to use with the software. If nothing is specified, the software tries to find the next License Leasing Server within your local network automatically. However, this might take some time to identify the server depending on how many computers are connected to the network. If you are operating the software within a Virtual Private Network (VPN) it is mandatory to explicitly configure the License Leasing Server address.
Follow the steps below to configure the License Leasing Server connection:
-
Close the software before you do the following steps
-
Open Windows Explorer and navigate to the installation directory of the software (typically, C:\Program Files\LabCognition\panorama)
-
Edit the Panorama.exe.config file with a text editor (e.g. Notepad)
Make sure to have administrator rights when starting the editor!If you do not have administrator rights, you are not permitted to save the file in that location. Alternatively, you can create a copy of the file in a temporary folder you have permission to write and then copy the modified file back to the original location afterwards.
-
In the section appsettings section add the following lines (without the <appsettings> start and end tags depicted with grey background!):
    <add key="LeasingSkipNetworkDiscovery" value="true" />
    <add key="LeasingAddresses" value="http://localhost:5100" />  </appSettings>```

*   LeasingSkipNetworkDiscovery
    This parameter controls whether the software tries to find the License Leasing Server automatically (false) or it will not scan the local network and uses a dedicated server's address instead (true)
*   LeasingAddresses
    This parameter is only evaluated in case LeasingSkipNetworkDiscovery is true. In this case, the License Leasing Server is directly connected through the given IP address (e.g. 192.168.0.1) or server name (localhost, your host name). Please make sure to use port 5100 for this communication.


8.  **Save** the _exe.config_ file.