Instrument Tab
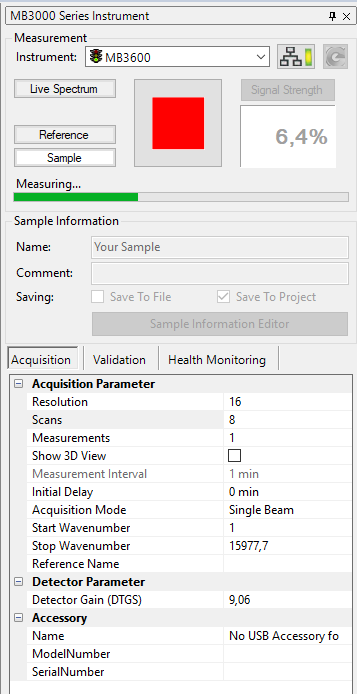
The Instrument Tab is the main control window for all instrument operations and parameters. Additional instrument functions can be accessed through the Instrument menu. The instrument tab is divided into three areas, the measurement/control area, the sample information and the parameters area. The parameters area itself is also tabbed to accommodate all parameters for Acquisition, Validation and Health Monitoring and Advanced Diagnostics.
The instrument tab looks like this:
Instrument Tab contents
The instrument has three areas:
-
Measurement
Holds all buttons to control the instrument and allows instrument selection. The button status changes according to current instrument status. -
Sample Information
Holds information concerning the sample naming. -
Parameters
Tabbed area holding instrument parameters for acquisition, validation, health monitoring and diagnostics.
Measurement Area
The measurement area accommodates the following controls:
-
Instrument Selection
A drop-down list shows all available instruments on the network that the application can connect to. Instrument that are available are depicted by a green traffic light and busy instruments that are currently used by a different application are shown with a "do not enter" sign
  . Simply select the desired instrument and the software will automatically connect to the instrument. Selecting a different instrument than the currently connected one will disconnect the current instrument and connect the newly selected instrument.
 -
Connect/Disconnect Button

Clicking this button will connect/disconnect the instrument from the application. The current connection state is depicted by the bar-color of the button:
- Grey button: Instrument is disconnected. Click the button to connect to the instrument.
- Green button: Instrument is connected. Click the button to disconnect from the instrument.
- Orange button: Instrument is in the process of connecting. Wait until the button turns green.
The application will display the last used instrument in the instrument list but will not connect automatically to it. The operator always has to manually connect to the instrument by clicking the Connect button. Alternatively, with an instrument being selected, the operator may just click the Measure, Live Spectrum or Reference button to directly connect to the instrument and start a measurement.
-
Refresh Button
 By clicking the refresh button the instrument list will be updated. If an instrument is already connected, the refresh button will be disabled. To update the instrument list a connected instrument needs to be disconnected by clicking the disconnect button.
 -
Signal Strength Display
Displays the current signal strength. For adjustment purposes it might be beneficial to have a larger display when standing far away from computer screen: By clicking on the signal strength button, a separate signal strength window will be opened on top of the application. It may be resized to full screen. Numbers will resized automatically:

-
Measure ButtonStarts a measurement. If not already connected, the software will connect to the selected instrument and start to acquire a spectrum with the actual parameters listed in the parameters area. A measurement can be aborted/stopped by clicking on the Stop-button. Please refer to the chapter Spectrum Measurement for detailed description of all measurement options.
-
Live Spectrum ButtonStarts a continuous data acquisition and displays them immediately in an online monitoring data view. Since the data is displayed in real time, this is useful for online monitoring and gain adjustment. The live spectrum mode can be stopped by clicking on the Stop-button. Measurement details of the current live spectrum acquisition are displayed in the status-bar:
![]()
-
Reference ButtonStarts a reference measurement with the selected parameters. The reference spectrum will be automatically saved to the \username\My Documents\HorizonMB Data\Reference folder after the measurement is finished.
Reference is bound to the instrument resolution!The instrument provides several spectral resolutions. For each available resolution a separate reference measurement is required. In case of changing the resolution you may need to measure a fresh reference or choose one from disc. However, the last used reference for the active resolution is selected automatically if available.
-
Stop Button
Stops/aborts running acquisition process.
Sample Information
The sample information area defines the name of the measured sample and additional comments:
-
Name
Enter a name to assign to the measured samples. -
Comment
Additional comments for the sample can be entered here.
To access all naming and saving options, please click on the ![]() button. The Sample Information Editor will be opened which offers detailed settings to name and save the samples. Please refer to the topic Sample Information Editor for a detailed description.
button. The Sample Information Editor will be opened which offers detailed settings to name and save the samples. Please refer to the topic Sample Information Editor for a detailed description.
Parameters Area
The parameters area lists all instrument parameters that can be adjusted or show relevant information. It is divided into four additional tabs for the different operations acquisition, validation, health monitoring and diagnostics:
-
Acquisition
Lists all parameters relevant for data acquisition. The parameters are subdivided into acquisition, detector, accessory and script processing parameters. A detailed description of the parameters is available in the chapter Spectrum Measurement. -
Validation
Lists all parameters and options relevant for instrument validation. Please refer to the chapter Validation for detailed discussion of the validation options. -
Health Monitoring
Lists all health monitoring parameters. These parameters show the current instrument condition. If any of the health monitoring parameters are not within the expected range, the health monitoring tab will change the status according to the conditions shown below to indicate a problem:
![]()
The health monitoring parameters and the tab flag have three states to indicate the current condition. Please refer to the chapter Health Monitoring for detailed description.

You might not have a sufficient license to see this tab. Please contact your vendor to upgrade your license.
- DiagnosticsThis tab needs to be activated by selecting the command Advanced Diagnostics in the Instrument menu. The tab will be toggled by selecting the menu command. It lists a large number of instrument parameters for advanced diagnostic purposes. These parameters are typically used by service personnel and hence are disabled by default.
You might not have a sufficient license to see this tab. Please contact your vendor to upgrade your license.