Validation
Validation is located as extra tab in the Instrument Tab and shows all options and parameters relevant for the instrument validation. The instrument validation is required to be run in certain intervals to ensure the instrument is working properly and returns reliable data. Validation offers different validation templates concerning the instrument type and extent of validation. Validation reports will be saved automatically and can optionally be printed.
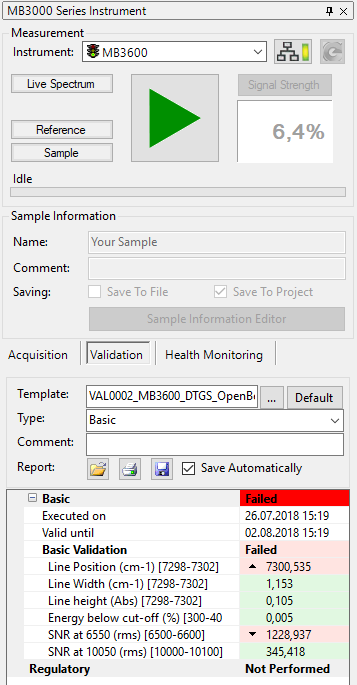
The validation tab looks like this:
Validation Tab Contents
Validate Button
Runs the instrument validation. The actual status will be displayed in the tab. Please follow the instructions to perform a validation:
-
Choose a validation template.
-
Choose the validation type (Default: Basic)
-
Click Validate button to start validation.
-
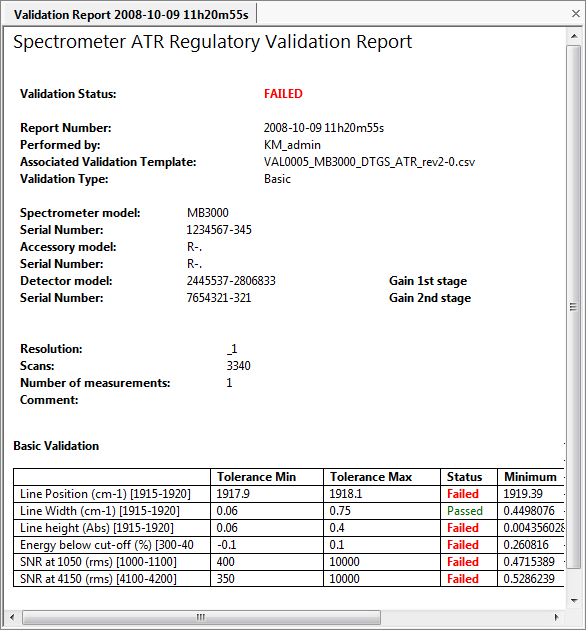
A detailed report will be displayed in the view area.
Instrument validation is performed and might take several minutes. The current status is shown in the dialog. After completion of validation a comprehensive report is provided:
Template
Selects the validation template. The user may select a different template by clicking on the button or choose the default template by clicking on the Default button.
Comment
A comment concerning the validation may be entered here.
Report
Different options for the validation report are available here. Buttons have been added here for convenience:
-
Load: Another validation report can be loaded using this button. However, you may also use the default Open command in the File menu to open a report.
-
Print: Print the current validation report. A print preview with the current report will be opened by clicking this button. However, you may also use the default Print Preview command in the File menu to show the print preview.
-
Save: The current validation may be saved using this button. However, you may also use the default Save command in the File menu to show the print preview.
-
Save Automatically: Check this box to save the validation report automatically after completion of the validation process.
Parameters
Shows a detailed listing with all validated parameters, their values and a pass/fail symbol:
-
 - Failed high: Validation of the parameter failed. Value is too high.
 -
 - Failed low: Validation of the parameter failed. Value is too low.
 -
 - Passed: Validation of the parameter passed. Value is in the expected range.