Sample Information Editor
The Sample Information Editor offers additional options to edit the name of a sample and to make manual adjustments to the attached labels. It also controls the Auto Save options for the measured samples. The editor looks like this:
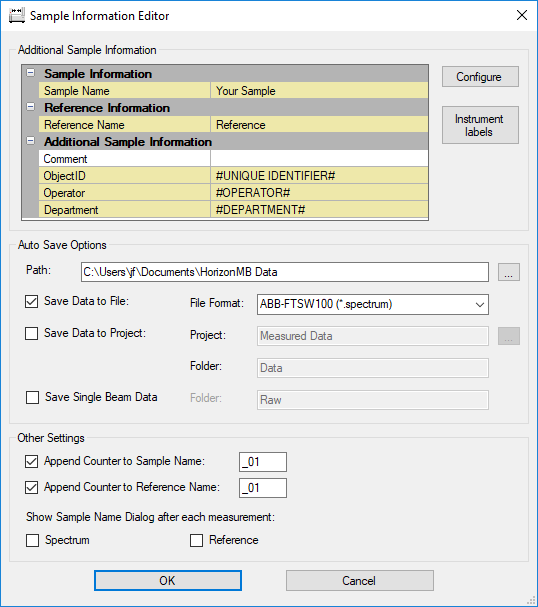
Sample Information Editor Contents
The dialog has four areas to control the sample information / auto save options:
Sample Name
The current sample name will be displayed here. The operator may edit or change the proposed sample name to his own liking. If the option "Append Counter to Sample Name" is selected, the name will be followed by the current counter number. The counter needs to be the last part of the name and the name can only be edited in front of the counter. Adding name parts after the counter is not allowed.
Additional Sample Information
Labels attached to the sample are displayed in this window. The user may edit the label values or configure the displayed labels by clicking on the Configure-button.
Auto Save Options
The auto save settings are adjusted in this group:
-
PathDefines the path where to save the sample file. A path can be entered manually or by clicking on the
 button and using the File Open Dialog. The default path is the HorizonMB Data folder in the users "documents" folder (which may differ depending on the operating system, e.g. \Documents and Settings\username\My Documents\HorizonMB Data\ for Windows XP).
 -
Save Data to File
Checking this option will auto save the measured sample to a data file using the file name entered above and the file format specified in the drop-down box. The user may choose any of the supported file formats. If this option is activated, the Save Data to Project option is unavailable. Only one save option may be selected. -
Save Data to ProjectChecking this option will auto save the measured sample to the selected project and subfolder. A project name can be entered manually or selected by clicking on the
button and using the File Open Dialog. Non existing projects will be created automatically. The sample data will be saved to folder inside the project which can be entered here. If the Save Data to Project option is activated, the Save Data to File option is unavailable. Only one save option may be selected.
Other Settings
Additional settings may be selected here:
-
Append Counter to Sample Name
Adds a simple counter to the end of the sample name which will be incremented for each measurement. The sample name will always end with the counter number if this option is selected. The counter will be reset if the software is restarted or the counter is edited manually. -
Show this Dialog after each measurement
If this option is selected, the Sample Information Editor will be automatically opened after each measurement. -
Custom Labels
A configurable list of custom labels can be added for each recorded spectrum. Default settings for those custom labels can be set in the dialog. Wildcards are allowed as indicated in the screenshot.
Custom labels are defined in a XML file which can be edited in a normal text editor like Notepad.exe (This is an application which is available on all MS-Windows computers).
To open the current custom label configuration, click the XML file name in the property grid. Then click the icon.
icon.
Update the custom label information in the file as desired according to the description given in the file header. Then save and close notepad to return.