Serial Number Update License
Serial Number Update License
Creating a serial number update license requires an existing license. The end customer needs to provide the serial number in advance. Please refer to the section "License Updates" for details on prerequisites.
When creating a serial number update license the following dialog is shown:
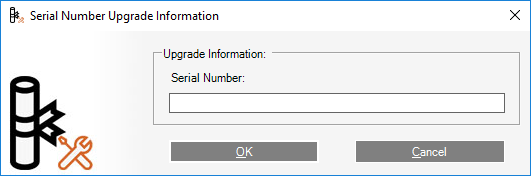
-
Enter the existing serial number provided by the end customer into the text field. Copy and paste operation is supported.
It is the number printed after "Serial No" in the Help->About dialog below.Where do I find the actual serial number of a license?The customer needs to tell you the serial number by phone or email. The customer can review his actual serial number in the Help->About dialog of his installed product. The dialog also contains the product name, serial number, dongle number, licensed modules, etc.
Ask the customer to do the following:
Start the product application
From the Help Menu in the software, choose the About Command.
A dialog similar to the one shown below is displayed then:
The customer needs to tell you / email you the numbers marked with a red rectangle.In some cases, it might be useful to take a screenshot of the dialog. (A screenshot of the active dialog can be taken with ALT-Print Screen keys.)
-
Click the OK Button to continue.
The Licensing Tool connects to the licensing server and information on existing license(s) related to the entered serial number are retrieved. This may take a while. The following dialog is shown with actual license status: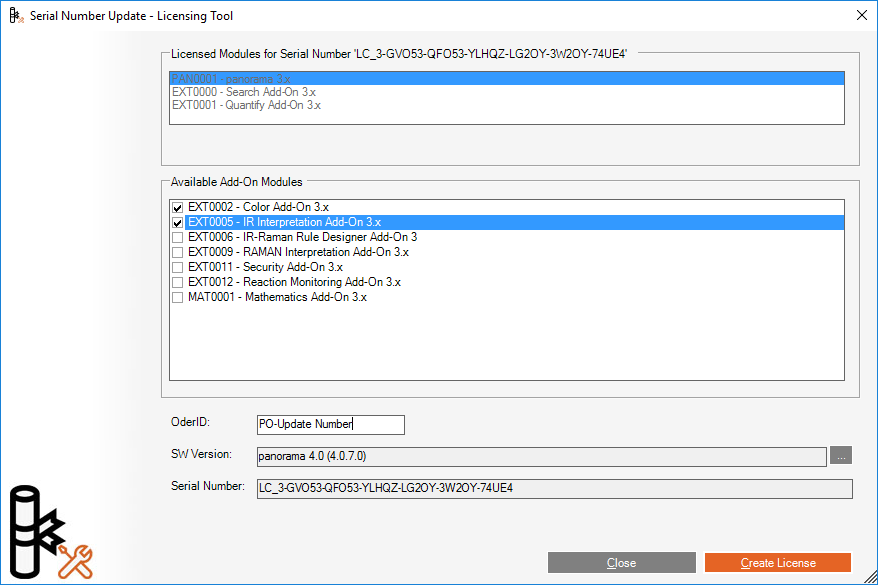
Already licensed product (Base Software) and Add-On Modules are listed read-only in the upper part of the dialog.
Add-on modules available for a license update are listed in the lower part and can be checked.
In the lower part of the dialog the actual serial number is shown read-only. -
Check the Add-On Module(s) required for the license update.
At least one Add-On Module needs to be selected for the update!Which modules does the final license contain?After selection of a appropriate add-on modules, all selections will be added to the previous license. A new serial number license is created containing all licensed components. After activation of the serial number update license the product will have all the functions of the previous license plus all selected add-on modules.
NOTE: All previous serial number licenses and license updates related to this end customer remain valid. They all can be reused but only on the same PC the initial license was registered on!
In addition previous serial number licenses or updates do not have the full capabilities of the latest update. They keep their original licensing scheme. Hence the end customer shall be advised to use only the latest serial number for registration to have full access to all purchased functions.
-
Insert a unique purchase order number (PO#).
This number is used as a reference on the invoice sent by labCognition to your company. This is a mandatory field! -
Choose a software installation *.msi file to let the Licensing Tool automatically determine the software version you are going to ship to the end customer. Click the
 icon to select a *.msi file on your local hard disc or USB-Key. The product name and the version number are shown in the field then.
 -
Click the Create License Button to continue.
The following dialog is shown to let you review your choice before submitting the license update request: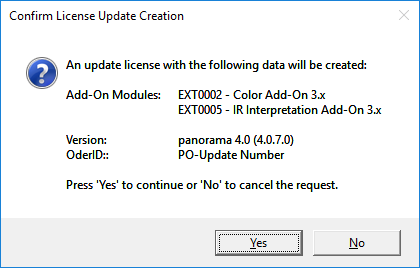
-
Click the Yes Button to create the license**
Click** the No Button to return to the previous step.
This may take a while, because the information needs to be transferred to the licensing server.
After successful license creation the following message is shown:
-
Click the Yes Button, if you like to create an email with the license information that can be send to the end customer.**
Click** the No Button to skip this step.Why is the dialog shown?You may setup to show this dialog in the Licensing Tool Options. Please refer to the section "Send Email after License Update" for details.
When choosing Yes, an email is created using your default email program. The email body text is taken from the pre-defined email template.
Enter the email address of the end customer into the recipient field.
Click the Send Button to submit the email.
NOTE: The email must be sent or discarded before you can continue working with the Licensing Tool! Otherwise the Licensing Tool is blocked!
-
Click the Print Label Button to print a license label (Optional)
After completion of serial number update license creation the Licensing Tool returns to the setup window shown above. Now all fields are filled for review. You may select and copy and paste any field contents into the clipboard for use in other applications.
This is useful if you like to create a license label with another application.Why is the Print Label Button not shown in my Licensing Tool?The Licensing Tool only supports DYMO Label Printers by default. Please review the section "Setup DYMO Label Printer" for details. The button only becomes visible if a valid DYMO label template file (*.LWL) is available in the start-up folder of the Licensing Tool.
License Information is sent to Clipboard!If you do not have a DYMO Label Printer you may use any other printer or software to print the license information. For convenience the Licensing Tool copies the full license information into the clipboard automatically. The following information is provided:
PO# number (contents of the placeholder %ORDERID%)
Software name (contents of the placeholder %PRODUCT%)
Software Version (contents of the placeholder %VERSION%)
Serial Number (contents of the placeholder %SERIALNO%)
Dongle Number (contents of the placeholder %DONGLEID%) This field is only copied when creating a dongle license or dongle license update.
-
Click the Close Button to return to the Main Window.
Each license creation is closed process and should not be mixed up with other processes. Therefore you need to return to the Main Window first to start the next process. The window is kept open for convenience to let you copy and paste contents.